Mesh Import
Introduction
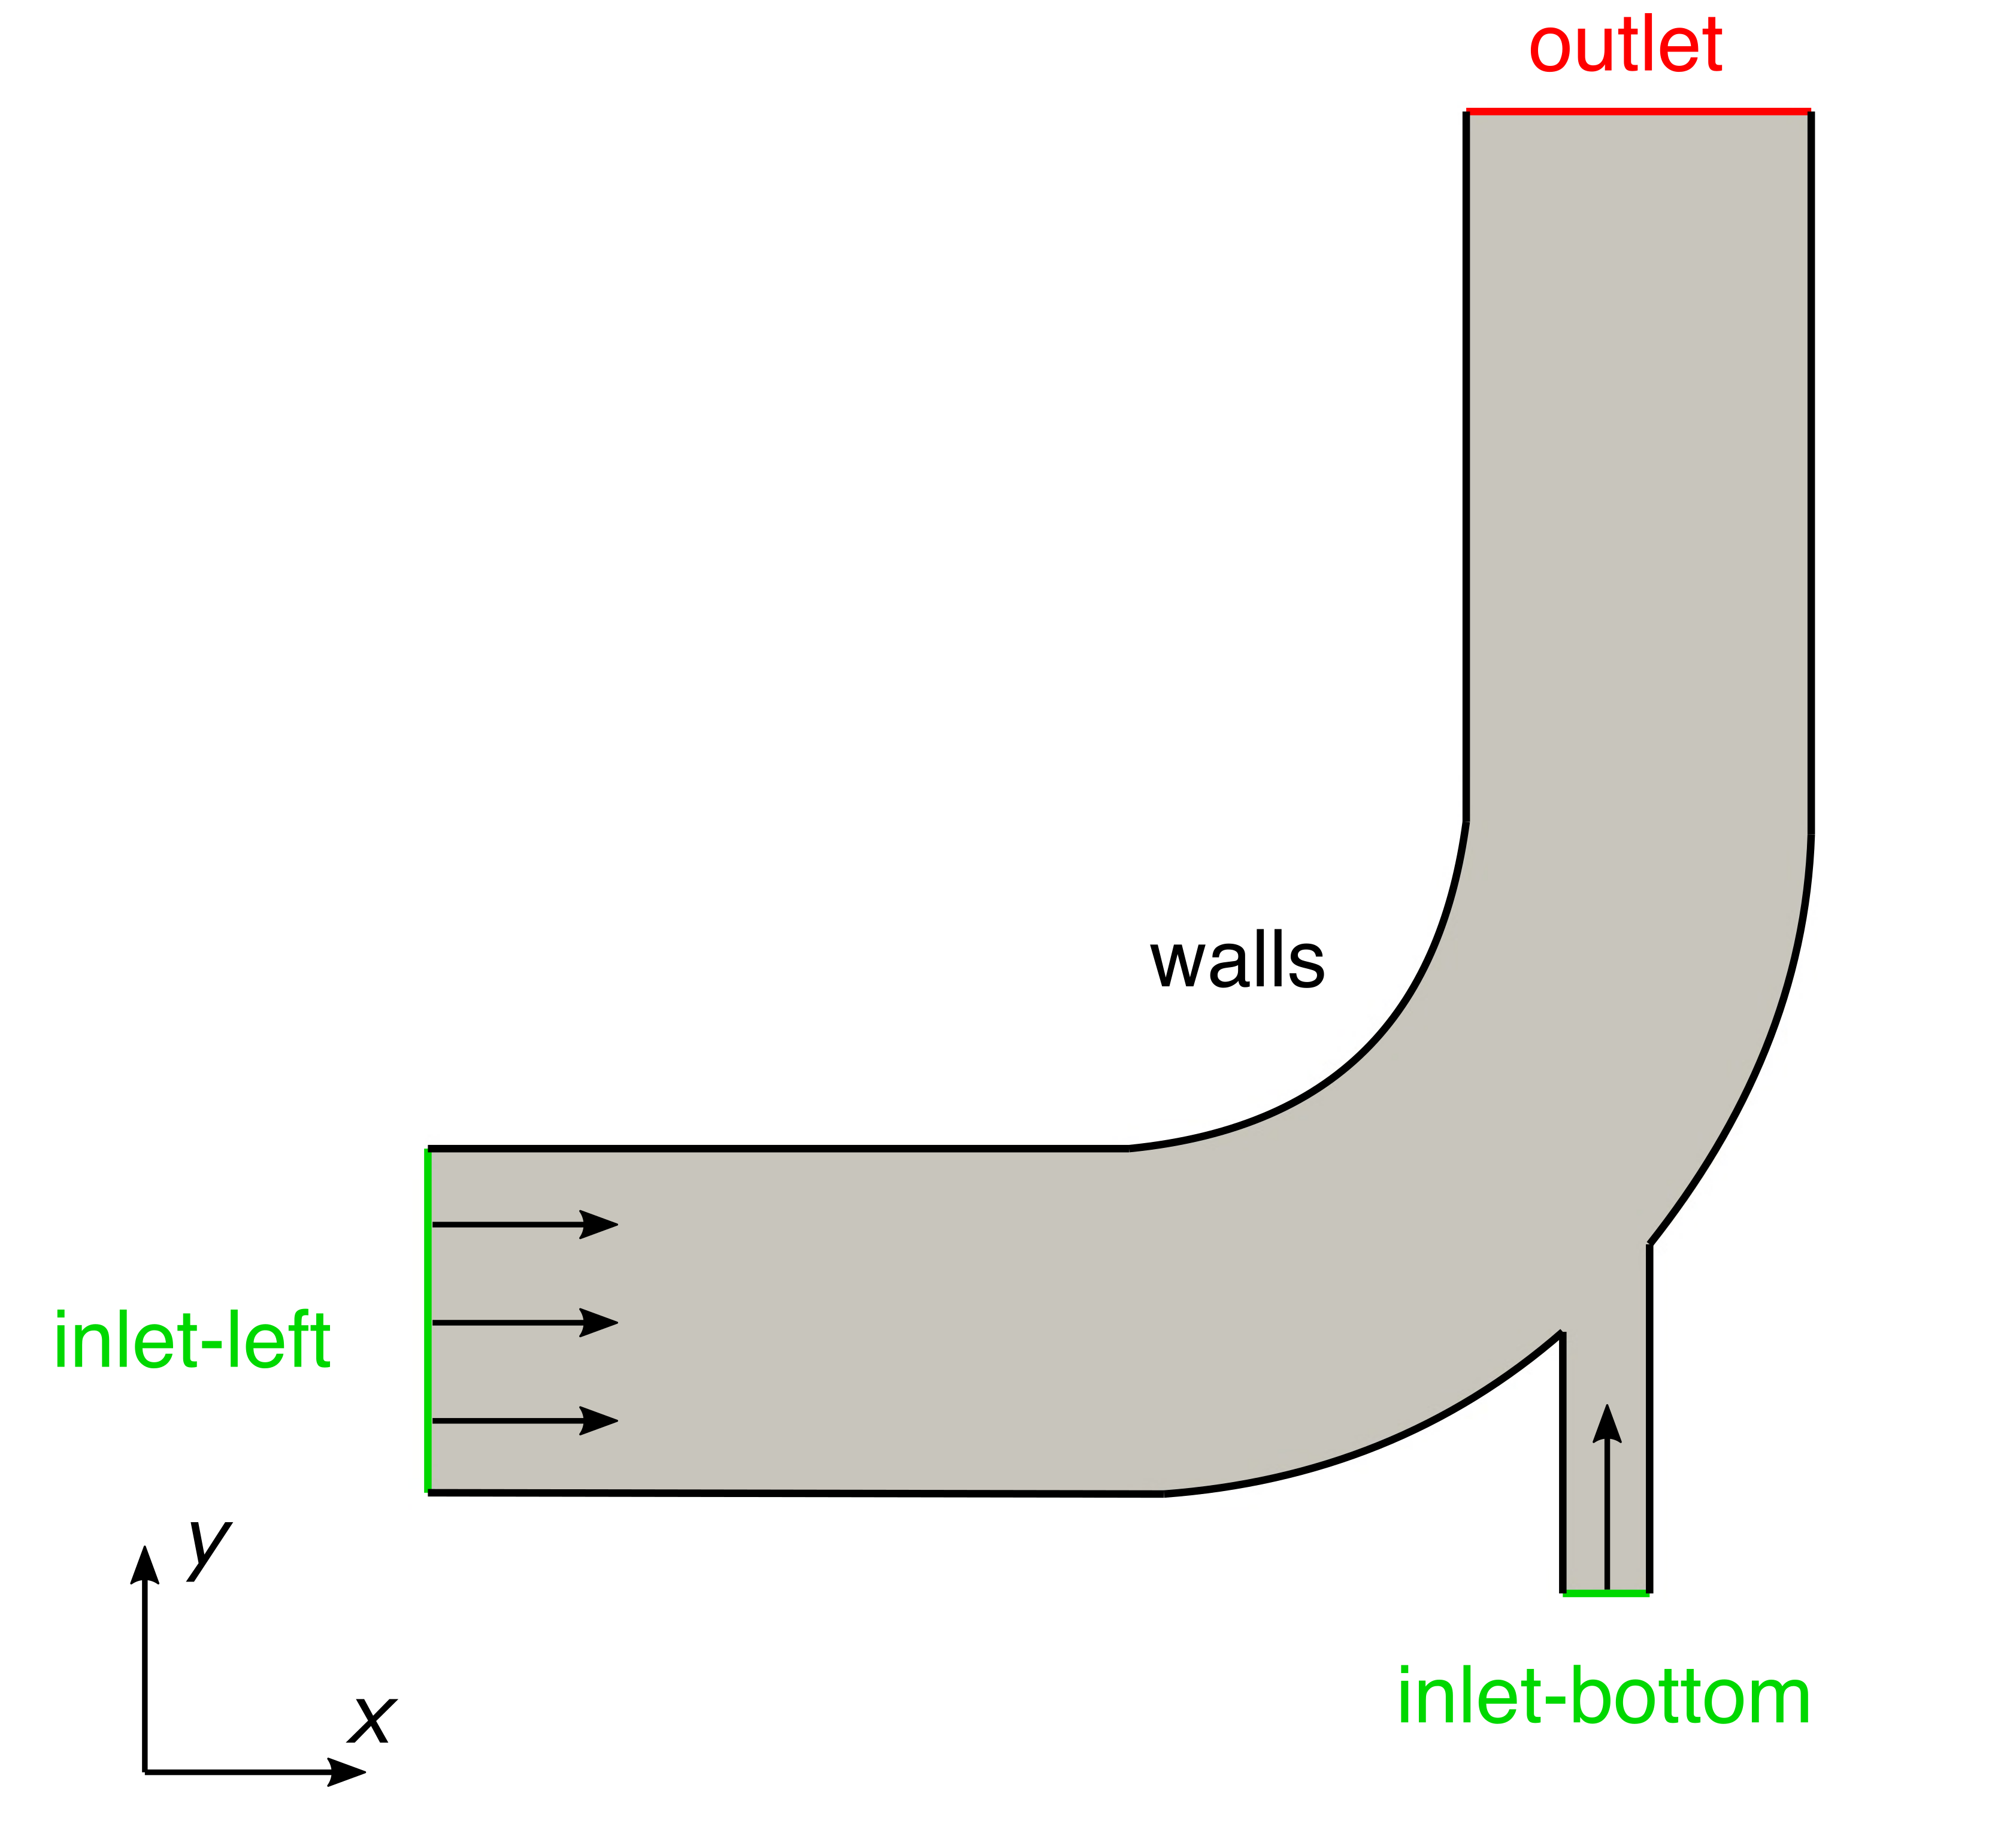
This tutorial explains the general OpenFOAM case structure, where the mesh information is stored and how to import a two-dimensional mesh created with an external software using fluentMeshToFoam. At the end, the mesh will be visualized using ParaView. The geometry of the case looks as follows:
Navigate with your terminal to the extracted sub-directory 1_elbow within the 2_mesh_generation directory.
Case structure
In OpenFOAM, the computational mesh, field data, model properties and numerical model parameters are stored in a set of files within a case directory. The case directory is given a suitably descriptive name, here 1_elbow. This folder contains the following subfolders and files:
1_elbow
├── system
|   ├── controlDict
|   ├── fvSchemes
|   └── fvSolution
└── elbow.msh

1 directory, 4 files
The relevant file for this tutorial case is:
elbow.msh: The two-dimensional mesh created with ANSYS ICEM CFD.
Mesh import
The mesh for this case has been created using an external software and is stored in the ANSYS Fluent mesh format *.msh. OpenFOAM offers a tool to import a mesh like this into the OpenFOAM format. In this case, when the terminal’s working directory is the 1_elbow case folder, the mesh can be imported using the following command:
fluentMeshToFoam elbow.msh
Here, fluentMeshToFoam is the executable for importing the mesh and elbow.msh is the argument pointing towards the mesh file inside the elbow case folder. The utility successfully imports the mesh and confirms this with the output:
...
Writing mesh... to "constant/polyMesh"  done.

End
The mesh has been successfully imported into the OpenFOAM format and stored within the constant/polyMesh folder.
The polyMesh directory
The polyMesh subdirectory in the constant directory stores the computational mesh in OpenFOAM. There are five individual files with the following content:
points: List of all nodesfaces: List of all faces of the meshownerandneighbour: Face-to-Cell relation of the meshboundary: List of all patches with their respective name and fundamental patch types.
The patch types specified in the boundary file, which are not associated with a geometric constraint are the generic patch and wall. The patch type is assigned to open boundaries such as an inlet or outlet which does not involve any special handling of geometric approximation or numerical connections.
The wall type also provides no special geometric or numerical handling, but is used for patches which coincide with a solid wall. The wall tag is required by some models, e.g. wall functions in turbulence modelling which require the distance to nearest wall.
OpenFOAM is designed as a code for 3D space and defines all meshes as such. However, 2D and axi-symmetric problems can be simulated in OpenFOAM by generating a mesh in 3 dimensions and then applying special boundary conditions on any patch in the plane(s) normal to the direction(s) of interest. 2D problems apply the empty patch type to the front and back patches, typically combined to a patch called frontAndBackPlanes.
Mesh quality
After importing or generating a computational grid, it is always recommended to check the mesh statistics and quality criteria. This can easily be done using the utility checkMesh from within the elbow folder. Just type in the terminal:
checkMesh
This will produce the following output to the terminal:
// * * * * * * * * * * * * * * * * * * * * * * * * * * * * * * * * * * * * * //
Create time

Create polyMesh for time = 0

Time = 0s

Mesh stats
    points:           1074
    internal points:  0
    faces:            3290
    internal faces:   1300
    cells:            918
    faces per cell:   5
    boundary patches: 6
    point zones:      0
    face zones:       0
    cell zones:       0

Overall number of cells of each type:
    hexahedra:     0
    prisms:        918
    wedges:        0
    pyramids:      0
    tet wedges:    0
    tetrahedra:    0
    polyhedra:     0

Checking topology...
    Boundary definition OK.
    Cell to face addressing OK.
    Point usage OK.
    Upper triangular ordering OK.
    Face vertices OK.
    Number of regions: 1 (OK).

Checking patch topology for multiply connected surfaces...
    Patch               Faces    Points   Surface topology
    wall-left           100      206      ok (non-closed singly connected)
    inlet-left          8        18       ok (non-closed singly connected)
    inlet-bottom        4        10       ok (non-closed singly connected)
    outlet              8        18       ok (non-closed singly connected)
    wall-right          34       70       ok (non-closed singly connected)
    frontAndBackPlanes  1836     1074     ok (non-closed singly connected)

Checking geometry...
    Overall domain bounding box (0 -4.53853 -0.937738) (64 64 0.937738)
    Mesh has 2 geometric (non-empty/wedge) directions (1 1 0)
    Mesh has 2 solution (non-empty) directions (1 1 0)
    All edges aligned with or perpendicular to non-empty directions.
    Boundary openness (-1.03633e-18 2.59082e-18 1.15147e-19) OK.
    Max cell openness = 1.87187e-16 OK.
    Max aspect ratio = 2.40135 OK.
    Minimum face area = 0.278218. Maximum face area = 7.72369.  Face area magnitudes OK.
    Min volume = 0.521792. Max volume = 7.36354.  Total volume = 3156.3.  Cell volumes OK.
    Mesh non-orthogonality Max: 36.302 average: 11.1868
    Non-orthogonality check OK.
    Face pyramids OK.
    Max skewness = 0.500248 OK.
    Coupled point location match (average 0) OK.

 Mesh OK.

End
This gives us all relevant mesh statistics and quality criteria of the mesh:
Mesh statscontains all general statistics about the mesh, such as number of points, faces, cells, and patches, as well as cell types.Checking topologychecks for the correct topology of the mesh both for cells and patches.Checking geometryreveals information regarding mesh quality with statistics such as maximum non-orthogonality, aspect ratio, and skewness, respectively.
All critical mesh quality statistics are within the tolerable limits and the final output Mesh OK. indicates that no critical problems or errors were found during checkMesh. Therefore, we can continue with this mesh and proceed with the simulation.
Mesh manipulation
checkMesh reveals one potential problem as the bounding box of the computational domain is \(64\,\text{m}\) in \(x\)-direction, \(68.54\,\text{m}\) in \(y\)-direction, and \(1.97\,\text{m}\) in \(z\)-direction. This indicates that the mesh is incorrectly scaled.
In order to manipulate the mesh, e.g. scale, translate or rotate, the OpenFOAM utility transformPoints can be used. In this tutorial, the overall size of the bounding box must be scaled from \(64\,\text{m}\) in \(x\)-direction down to \(64\,\text{mm}\). This results in a scaling factor of 0.001 in all three dimensions. As a result, the transformPoints command has to be executed using the scale option as follows:
transformPoints -scale "(0.001 0.001 0.001)"
Once executed, the mesh will be scaled down by a factor of 1000.
If this command is executed twice, the mesh will be scaled by \(0.001 \times 0.001=10^{-6}\).
It is impossible to memorize the syntax and functionality of all OpenFOAM solvers, utilities and post-processing tools. Therefore, you can always execute a command with the optional parameter
-help. This will give you a detailed list of all options and how to use them, i.e. in this example how to use thescaleoption of the mesh manipulation utilitytransformPoints.
Viewing the mesh
Before the case is run it is a good idea to view the mesh to check for any errors. The mesh is viewed in ParaView, the post-processing tool supplied with OpenFOAM. The ParaView post-processing is conveniently launched on OpenFOAM case data by executing the paraFoam executable from within the case directory.
Any UNIX/Linux executable can be run in two ways: as a foreground process, i.e. one in which the shell waits until the command has finished before giving a command prompt; or as a background process, which allows the shell to accept additional commands while it is still running. Since it is convenient to keep ParaView open while running other commands from the terminal, we will launch it in the background using the & operator by typing:
paraFoam &
This launches the ParaView window and opens the elbow case as shown in the following figure:
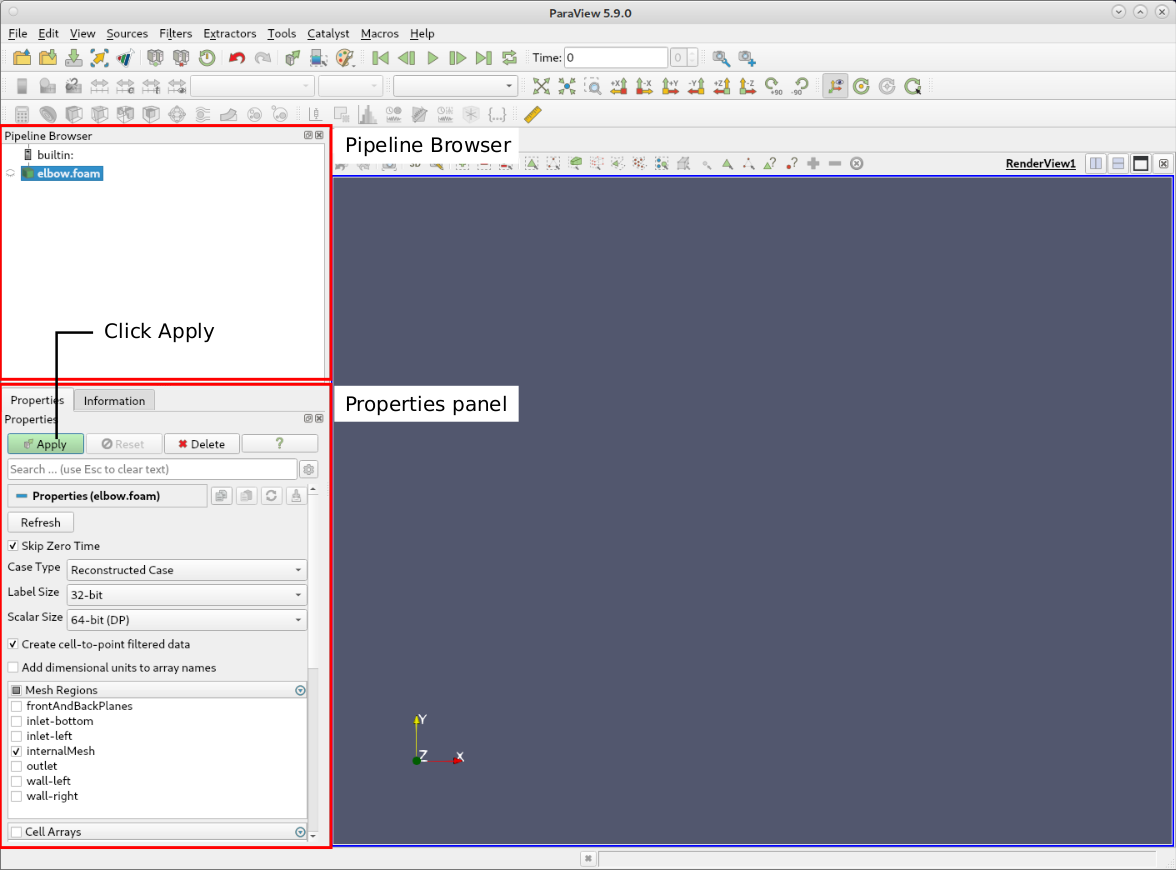
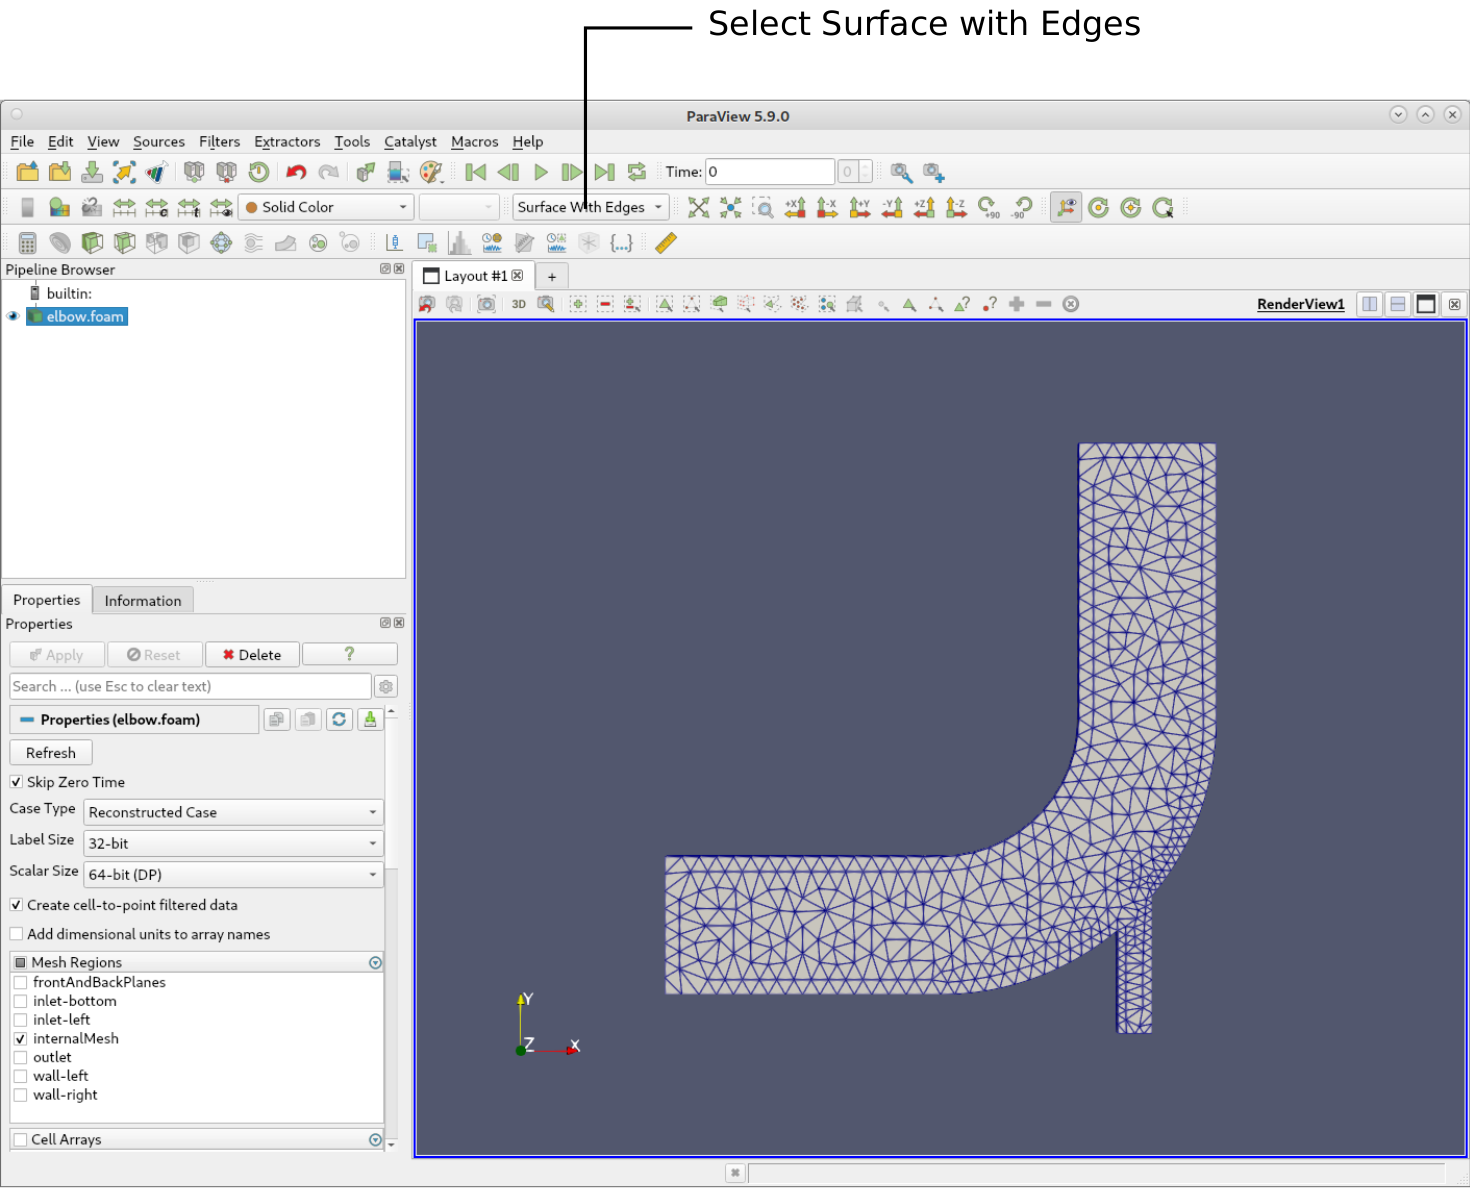
In the Pipeline Browser on the left, the user can see that ParaView has opened elbow.OpenFOAM, the module for the elbow case. Clicking on the green Apply button in the Properties panel displays the computational domain. Selecting Surface with Edges in the top center menu bar shows the computational mesh as follows:
Many advanced parameters in the Properties panel are only available by clicking the Advanced Properties gearwheel button at the top of the Properties window, next to the search box.
Conclusion
This concludes the first case in the Meshing Tutorial. We have:
- Successfully imported a ANSYS Fluent mesh file
*.mshinto the OpenFOAM case structure using the commandfluentMeshToFoam, - Checked the mesh quality with
checkMesh, and - Visualized the mesh with ParaView.